Wednesday, October 26, 2016

Sunset at Sea

Last, but not least, the final post about quilts I entered in this year's quilt show, Stitches in Time 2016. You can read about the show here:  http://museumquiltguild.blogspot.com/ 


The pattern I used for my "Sunset at Sea" quilt came from a magazine article in Quilters Newsletter Magazine, June 2006. The pattern, "After the Storm at Sea", was designed by Barbara Wynne, but I altered the placement of the fabrics in an attempt to evoke the setting sun with streaks of color and light coming through the clouds at sunset. I saved the pattern for many years and started to collect batik fabrics that looked like the colors of a spectacular sunset over the ocean, evocative of the many sunsets my husband and I have seen while on vacation. The sunsets that we viewed from Chincoteague and Assateague Islands are more toward the mainland than over the ocean, but still spectacular.


This is my most recent quilt. I started piecing it in early April. The pattern is a paper-pieced pattern. For those who don't quilt, a paper-pieced pattern is sewn onto paper, along printed lines. It adds several extra steps to the process, but the result is usually accurate piecing. In a traditional "Storm at Sea" pattern, of which this is a derivative, there are some pieces that must be cut accurately and not on the bias of the fabric. Bias cuts can stretch and you will end up with wonky blocks. In the photo below, you can see my first few blocks on the design wall. The long diamond shapes have fabrics that could stretch, if not cut the right way. Using a paper foundation takes away some of the concern about biases. However, when making a quilt with paper on the back of each block, it gets cumbersome. More on that later!


My "Sunset at Sea" quilt in its infancy.
The small square blocks are 4" x 4", the larger square blocks are "8" x "8", and the diamond blocks are 4" x 8".
You can see one of the 8" x 8" paper patterns in the photo.


As I continued making the blocks, the sunset image emerged, with deep hues of red, orange, navy, and burgundy at the horizon and lighter pinks, blues and lavender in the sky. At least that is what I was going for! My design wall grew.


To audition fabrics, I placed swatches in the spaces where the 8" x 8" blocks would go.
I wanted to plan the color placement to achieve my sunset image.


When I purchased the fabrics to make this quilt, I bought either half yards or quarter yards. It proved to require some creativity on my part. I kept all of my scraps, even the smallest, and it was a good thing that I did. I ended up piecing some of the fabrics just to make one diamond or triangle here and there. I feel a deeper relationship with quilters of the past when I piece tiny bits of fabric to make it work.


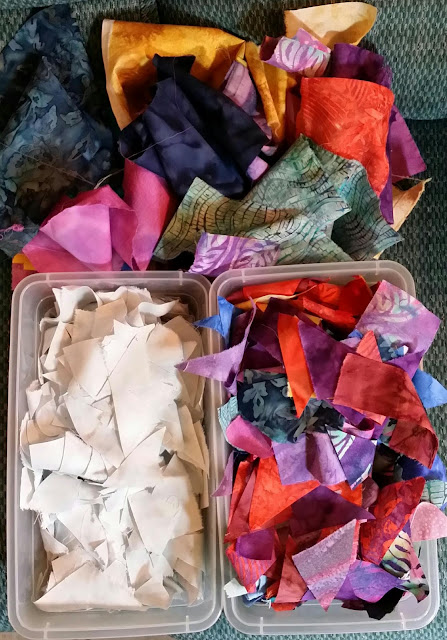
I worked with my scraps to build some smaller pieces to use in the blocks.
This is what I had left to work with near the end of the block construction.


As the quilt grew, it got heavier and heavier because it had paper on the back of every piece. I have made many paper-pieced quilts over the years, but never with such large blocks. Everything I have ever read about making quilts with paper piecing says to leave the paper on while sewing the blocks to each other, and it is my typical practice, unless there are no biases to deal with. This pattern didn't mention anything about construction after making the blocks, so I went with what was the conventional practice and left the papers on. It was so heavy, that the papers kept tearing and I had to tape them. Ugh. But, I persevered and got it constructed. I kept my sewing room door closed so my husband wouldn't have to listen to me growling. He thinks its strange that I growl when I am frustrated. I think it is better than swearing, although I just might have uttered a few cuss words here and there along the way!


Close-up of an 8" x 8" block from the back of the quilt.
The fabric is sewn to the reverse side.
Note the tape holding the seams together.
Tape and a hot iron are not a good mix.
I used a pressing cloth to save my iron.


Think about how heavy a stack of copy paper is.
Add that to some fabric.
Add some tape.
This was a heavy thing to try to pin together and sew accurately.
At the show, a quilt guild member advised me to straight stitch all around each block and remove the paper before assembly.
I'll try that next time!
I do own lighter weight paper that is just for paper piecing, but I made these patterns at the copy shop and used their paper.
I believe it would have helped a bit with the weight to have used it, but it definitely would have torn more easily.


Did I mention that when you sew a paper-pieced block that you use tiny stitches? That is so it makes it easy to remove the papers from the back. Easy is a relative term. Tweezers in hand, I tackled the back and pulled off each little piece of paper and tape and dug out the little pieces that were stuck under the thread. My husband often asks me if I am having fun when I am sewing. My answer is usually yes, but some parts of the process are more fun than others! The best part, though, is having a result you are happy with.


I completed the quilt top by the end of May and took it to a local quilt shop to be quilted on a long-arm quilting machine. I wanted some stitching that would travel along the "waves" in the pattern. I think she hit the mark, and then some!


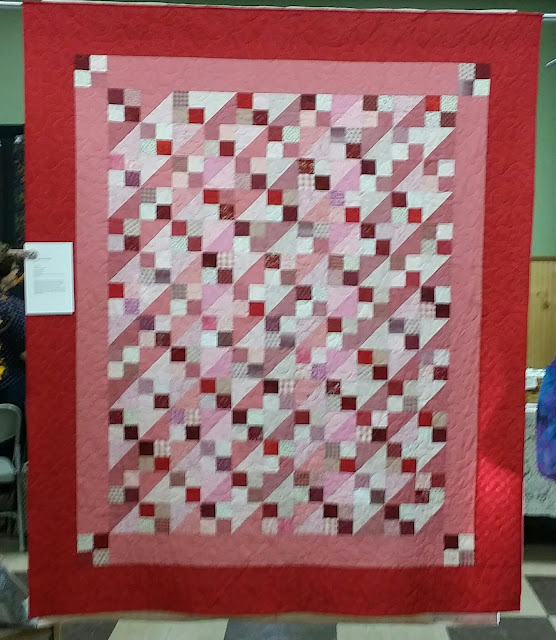
Below is the finished quilt. The image is a bit blurry because I was very excited when I took the photo. My quilt won an award at the show! I was so excited that I couldn't hold the camera steady as I took a photo to text to my husband. He had supported me through all the work I did to get my quilts finished and into the show, so I wanted to share the moment with him. It is my very first quilt show award. :-)


"Sunset at Sea"
47" x 57"
Pattern: "After the Storm at Sea"
Quilters Newsletter Magazine, June 2006/No. 383
Paper Pieced by Machine
Custom Machine Quilted by Chestnut Bay Quilting


Close up of the Show Co-Chairman's Award
The little blocks that are part of the award are paper pieced and were made by guild members.
The image is the Holland Land Office Museum, where our guild's meetings were held when the group first formed, which is now part of our guild's logo.

Knowing I would write a blog post one day about my "Sunset at Sea" quilt, I took photos during the construction journey, so I could tell a story. I couldn't have known at the time that the story would have a happier ending than I ever would have dreamed. Now that the show is over and I have blogged about this and the other five pieces I put in the show, its time to resume a normal pace. You can see my other quilts here in my previous posts: studioemmy.blogspot.com/  


Our guild is currently making ornaments for the annual "Wonderland of Trees" exhibit at the Holland Land Office Museum. The guild puts a tree in the exhibit every year. I pulled a few of my small paper-pieced orphan blocks to finish as ornaments. It is a good task for now when I am in an after-the-quilt-show fog. It keeps me sewing and, of course, while searching for the orphan blocks, I discovered a few other projects that just might end up getting some attention now.


Two 4" x 4" orphan blocks from my stash of Christmas blocks.
These will be made into ornaments for the guild's tree at the museum.
I'll use the bindings that you see above the blocks to frame them.
They are left overs from previous projects.
That is why I never throw the ends and snippets away until they are all used up.
You are bound to find a use for them . . . if you can figure out where you put them!

Thanks for stopping by to read my blog. As always, your questions and comments are welcome. And until we meet again, may the Lord hold you in the hollow of His hand.


Emmy


Sunday, October 23, 2016

Little Bee

Made of wool, penny rugs are representative of the kinds of domestic arts that women and girls pursued during the mid- to late-1800's. They have become popular again with today's quilters. I was drawn to these mysterious little things when I browsed quilt magazines or visited quilt shops. I wasn't sure how to make one, but true to form, instead of asking about them or taking a class, I decided to make one on my own. I don't know when or where I got the notion that I can make things without instruction! As is usually the case, I needed some help. When I saw a class offered at Mt. Pleasant Quilting Company, titled: Enchanted Pennies, I signed up. You can read about Mt. Pleasant on their website: http://www.mtpleasantquiltingcompany.com/


I gathered up the wool pieces I had acquired and headed off to my first class. As I sat at the table, I noticed the pretty wools the other women had in front of them. Mine didn't look at all like theirs. What I discovered was that the packet of "wool" that I purchased in a wool and yarn shop was actually felted and not 100 percent wool. It looked like wool to me when I bought it, but it didn't look like what everyone else brought to class. I decided to be frugal and make do with what I had. After all, this was a craft that had its humble beginnings when the makers used wool scraps from clothing, which is far removed from the conveniences of today with beautiful quilt shops where quilters can buy patterns, fancy hand-dyed wool for handwork, and threads in every possible color, shade and hue.


Several of the women who sat near me in class were very nice and generously shared their soft pretty wool scraps with me. I think they felt sorry for me! I used the donations and was grateful to have them. "Thank you", my anonymous quilt-y angels! We learned a few embroidery stitches in class, but then after a couple classes, I didn't finish the project. When I had surgery in 2014 and 2015, I worked on it a little while I recovered. In the beginning of this year, I listed my UFOs, which in the quilting world are UnFinished Objects. You can read about my UFO list here:  http://studioemmy.blogspot.com/2016/03/about-those-ufos.html This piece was on that list. Having the quilt show this year was a good incentive and helped me complete it. Here is a link to my quilt guild's blog, where you can read about the quilt show:  http://museumquiltguild.blogspot.com/


When I finished all the embroidery on my piece, I noticed a vacant area in the upper right corner. I decided it needed something. I cut out some of my "wool" and made a little bee that I heavily beaded. I liked him so much that I named my piece "Little Bee" in his honor. :-)


He is only an inch long from nose to tail, but he was so much fun to create,
that I named my wall hanging after him.


There are definitely more penny rug and wool projects in my future. At the quilt show, I purchased some of the "good stuff" and some high-quality embroidery thread from a vendor. I am a strong believer in buying the best quality materials that I can afford. Having the right tools and good materials goes a long way to producing a nice piece. So why I decided to make do with my wool pieces is probably due to being brought up by parents who lived through the Great Depression. Everything had to be used in our house until it was used up. Little pieces of string were tied together to make a longer piece and wound around a jar filled with buttons. Cups with broken handles became flower pots. My mother took clothes that had served their purpose, and were not suitable fabric for rags, to an elderly lady who used them to make braided rugs; but before she delivered them, she snipped the buttons off and saved them in her button jar! It has been hard to break myself from the habit of saving every little thing just in case I find a new use for it someday. And, all in all, even though the wool in my piece was not the "good stuff", I do like how it turned out. I learned a lot in making it, from selecting the right fabrics and thread, to learning a variety of embroidery stitches and taking a class.


"Little Bee"
Wall Hanging
23" x 18"
Pattern: Enchanted Pennies
Book: Pennies From Heaven by Gretchen Gibbons
Wool on Cotton Background
Embroidered by Hand
Quilted by Hand


Thank you for stopping by to read my blog. As always, your questions and comments are welcome. I plan to write another post soon with my sixth and final quilt from the show. Until then, may the Lord hold you in the hollow of His hand.

Emmy


Friday, October 21, 2016

Christmas Memories

I have admired embroidery for years, and especially redwork, aptly named because the thread used for the embroidery is red. I tried to embroider many years ago when I was in my 20's. I thought it would be cool to embroider flowers on the yoke of my Levi's jeans jacket. I had no clue as to what I was doing and it was disaster! But, when I saw the pattern for this piece, I knew I wanted to give it another try. Being in the 21st century, I could still go it alone, but now with the aid of YouTube video tutorials. YouTube has been a great help to me, no matter the hour, when I have wanted to learn a new technique for either knitting, papercrafting, sewing, or quilting.


My first exposure to embroidery and redwork was when I was a child. All of my pillowcases were embroidered with cute little animals, baskets of flowers, or had crocheted lace trim along the edge. In fact, I didn't know there was such a thing as a plain pillowcase until I stayed overnight at other kids' houses. I was shocked to see a naked pillowcase. I thought all children dreamed on hand-embroidered and lace-edged pillowcases.


My "Christmas Memories" piece was in the quilt show that my guild held last weekend. You can read about the show here: http://museumquiltguild.blogspot.com/ and you can see other quilts I entered in my recent blog posts. I wasn't sure that I would be able to do the redwork or if I would like it, but I gave it a try and found I enjoyed it immensely. It took some practice to get the stitch gauge the way I liked it. I considered making this into a pillow for the sofa at Christmastime, but decided to use it as a wall hanging, as the pattern calls for. Since my husband happens to be very good friends with Santa Claus, and has helped him out over the past 40 years by making appearances as Santa, I made this with him in mind. Now, we just need to find where to hang it for the holidays. :-)


Now that I know how much I like to embroider, I plan to do more. I purchased a book of stitches, so I can practice and I may delve next into Crazy Quilting. You can read about crazy quilting here: https://en.wikipedia.org/wiki/Crazy_quilting  Once I become interested in something, it is hard to know where to stop! When it comes to quilting, there is always something new to learn!

Christmas Memories
29" x 19"
Wall Hanging
Pattern: Merry Christmas by Betty Alderman Designs
Embroidered by Hand
Quilted by Hand

Thank you for stopping by today to read my blog. Your questions and comments are welcome. And, as always, may the Lord bless you and keep you and until we meet again, may He hold you in the hollow of His hand.


Emmy


Wednesday, October 19, 2016

Stars Over Chincoteague

Another quilt from my guild's quilt show! (You can read about the show here: http://museumquiltguild.blogspot.com/ and you can see other quilts that I entered in the show in my most recent posts.) This quilt was inspired by our trips to Lancaster County in Pennsylvania. My husband and I make frequent visits to the Lancaster area and marvel at the farms, gardens, and quilts of the Amish. The Amish are known as the plain people, but there is nothing plain about their quilts or their flower gardens. They are full of color. Amish quilts sometimes have a black background with solid colors used for the blocks, which are often primary colors or jewel tones.

The fabric for this quilt was purchased at Zooks, in Intercourse, Pennsylvania, which is probably my favorite fabric shop. I always look forward to shopping there and used to have an elderly Amish woman, Rebecca, wait on me. We struck up a friendship of sorts, and when I went there to shop, we talked about different things. Many of those things were the similarities we shared in our lives. She reminded me of my Aunt Mabel. Straight forward, no fuss, with a charming homespun sense of humor. Being that my grandfather, my Aunt Mabel's father, emigrated from Germany to Titusville, Pennsylvania, and then to Alexander, New York, we might be from a similar background, . . . or at least that is what I like to think! Rebecca isn't working there now. I miss her when I go there, but have fond memories of her. :-)

It was my intention to make this quilt by hand, without a machine. I started making the blocks while my husband and I were on a winter vacation on Chincoteague Island, Virginia. It was pretty slow going. My husband suggested we drive up to a fabric store on the mainland to see if they had machines to rent. It was a great idea, but they didn't have rentals. So, off we went to Salisbury, Maryland, where, instead of picking up a rental, I found a really nice little Bernina machine that had been used in classes and was on sale at a good price. It didn't have a lot of bells and whistles . . . just the basics, which is all I needed. That was in 2007. I still use that little machine often. I completed all the blocks a few years ago, but still had to put them into rows. I assembled the rows and made the inner and outer borders this year and finished it on my little Bernina.

The quilt gets its name from our nightly jaunts to see the stars while we were on Chincoteague. Being at the coast, we were able to see the stars at the horizon and overhead in the winter sky. It was pitch black out there! The nights on Chincoteague during the winter are more like the nights here in October . . . a little chilly, but not freezing, so we could just watch the night sky for hours!


Stars Over Chincoteague
75" x 75"
Pattern: Sawtooth Star
Book: Simply Stars by Alex Anderson
Machine Pieced
Custom Quilted by Chestnut Bay Quilting


Thank you for stopping by to read my blog. I hope you enjoyed reading about "Stars Over Chincoteague". I plan to write again later this week about other quilts that were in the show. Until then, may the Lord bless you and keep you and may He hold you in the hollow of His hand.


Emmy

Monday, October 17, 2016

Joy!

The past month has been consumed by quilting and preparations for the Museum Quilt Guild Stitches in Time 2016 Quilt Show. Read about the show here: https://www.facebook.com/MuseumQuiltGuild/


Our dear long-time guild member, Kate Martin, passed away after a brief illness. She had been instrumental in many facets of our guild and we miss her bright smile and willing spirit. She had been taking care of the publicity for the show, but when she became ill, the guild needed someone to step in and take over where she left off. They asked me to do it because I had done the publicity for the show in 2012. It added a little more to my days, but I approached it like a fun little job and dedicated about an hour or two a day to it starting in mid-August. It all worked out and the show, which was this past weekend, was a success, as always. I don't know how many people walked through the aisles of quilts, but it was steadily busy.


I was determined this year to enter as many quilts as I could get completed in time for the show. On the day we had to submit our quilts to the show committee, I bravely, and maybe a bit stupidly, entered six items. Then I got nervous . . . and busy! Having a lot of UFOs, the upcoming show was a good impetus to complete some of them. They were all in different stages of un-doneness. See my post about UFOs here: http://studioemmy.blogspot.com/2016/03/about-those-ufos.html


One quilt in particular that I really wanted to finish was a blue and yellow log cabin quilt that I started in 2000. It is comprised of 9-inch paper-pieced blocks in a pattern that I drafted for an earlier project. Once that project was complete, I still had a lot of patterns left over. I decided to use them for this quilt. I brought it to the home I share with my husband when we got married in 2004, still in pieces. I took it with me to a guild retreat a few years ago and completed the blocks. Earlier this year, I sewed the rows together and finally finished the top. My only quandary was whether or not to put a border on it. After looking at it atop the bed, I decided to just bind it and let the blocks speak for themselves, sans border.


2000 was a challenging year for me and it is funny that I even chose to make a blue and yellow quilt, because I didn't really have much blue fabric! I had yellow, but not much blue. Of course, there was plenty of blue fabric for sale at the quilt shops, and I was able to add to my stash! While I was making this quilt, a friend stopped by and when she saw it, she told me she had recently attended a quilt lecture and heard the speaker say that when there is yellow in a quilt, it represents the light of Christ. When she told me about this, I then knew why it was bringing me so much happiness to work on it and why I was drawn to it. That is why I named this quilt "Joy".


"Joy"
72" x 72"
Log Cabin Quilt
Quilted by Mt. Pleasant QuiltingCompany
Log cabin blocks can be set in a variety of ways.
This setting is called Barn Raising.
Log cabin blocks traditionally have a red square in the center, which represents the hearth.
The "logs", which make up the rest of the block are the walls of the home.


I spent a little time today in my sewing room. It needed to be straightened up after getting ready for the show! I am looking forward to starting something new. :-) Thank you for stopping by to read my blog. I plan to write more posts this week and include the rest of the quilts that I had in the show. Until then, may the Lord bless you and keep you and may He hold you in the hollow of His hand.

Emmy


Sunday, October 16, 2016

Finishing some UFOs ...

Just a little over a month ago, I was working on finishing the projects that I had committed to show in my quilt guild's biennial Stitches in Time Quilt Show. In February I wrote about my quest to work on my UFOs. You can read about it here:
http://studioemmy.blogspot.com/2016/03/about-those-ufos.html
Determined to make a dent in them, I set out to work on one of my oldest quilt tops. It was a pink and red Jacob's Ladder pattern, which is an old quilt design that has been around for years. I started making it about 20 years ago. Over the years, at different times, I pulled it off the shelf and made blocks, and eventually had enough blocks made to sew them into rows. So, when I pulled it out this spring, I needed to sew the rows together and then add a couple borders. Having decided that I would use only fabrics from my stash of the original pinks and reds I had used in the blocks,  I auditioned several different ones for the inner and outer borders. When I found what I liked, I had barely enough to reach around the quilt,  but in Tim Gunn fashion , I made it work by adding 4-patch blocks to the corners.

"Picnic"
64" x 76"
Machine Pieced
Machine Quilted by Mt. Pleasant Quilting Company

I named this quilt "Picnic" because it reminded me of a picnic table cloth. This is the first of six quilts I put in the show. I plan to post the other five here on my blog this week. 

Thanks for stopping by. I hope you enjoyed reading this post.

And until we meet again, may the Lord hold you in the hollow of His hand. 

Emmy